Elder.js: An SEO-First Svelte-Based Framework
Elder.js is an opinionated static site generator and web framework built with SEO in mind. (Supports SSR and Static Site Generation.)
Features:
- Build hooks allow you to plug into any part of an entire page generation process and customize as needed.
- A Highly Optimized Build Process: that will span as many CPU cores as you can throw at it to make building your site as fast as possible. For reference, Elder.js easily generates a data intensive 18,000 page site in 8 minutes using a budget 4 core VM.
- Svelte Everywhere: Use Svelte for your SSR templates and with partial hydration on the client for tiny html/bundle sizes.
- Straightforward Data Flow: By simply associating a
datafunction in yourroute.js, you have complete control over how you fetch, prepare, and manipulate data before sending it to your Svelte template. Anything you can do in Node.js, you can do to fetch your data. Multiple data sources, no problem. - Community Plugins: Easily extend what your Elder.js site can do by adding prebuilt plugins to your site.
- Shortcodes: Future proof your content, whether it lives in a CMS or in static files using smart placeholders. These shortcodes can be async!
- 0KB JS: Defaults to 0KB of JS if your page doesn't need JS.
- Partial Hydration: Unlike most frameworks, Elder.js lets you hydrate just the parts of the client that need to be interactive allowing you to dramatically reduce your payloads while still having full control over component lazy-loading, preloading, and eager-loading.
- esbuild: Blazing fast reloads during development. (We consider this experimental until esbuild is stable).
Project Status: Stable
Elder.js is stable and production ready.
It is being used on this site and 2 other flagship SEO properties that are managed by the maintainers of this project.
We believe Elder.js has reached a level of maturity where we have achieved the majority of the vision we had for the project when we set out to build a static site generator.
Our goal is to keep the hookInterface, plugin interface, and general structure of the project as static as possible.
This is a lot of words to say we’re not looking to ship a bunch of breaking changes any time soon, but will be shipping bug fixes and incremental changes that are mostly “under the hood.”
As of September 2020, the ElderGuide.com team expects to maintain this project at least until 2023-2024. For a clearer vision of what we mean by this and what to expect from the maintainers as far as what is considered "in scope" and what isn't, please see this comment.
Context
Elder.js is the result of our team's work to build this site (ElderGuide.com) and was purpose built to solve the unique challenges of building flagship SEO sites with 10-100k+ pages.
Elder Guide Co-Founder Nick Reese has built or managed 5 major SEO properties over the past 14 years. After leading the transition of several complex sites to static site generators, he loved the benefits of the JAM stack, but wished there was a better solution for complex, data intensive, projects. Elder.js is his vision for how static site generators can become viable for sites of all sizes regardless of the number of pages or how complex the data being presented is.
We hope you find this project useful whether you're building a small personal blog or a flagship SEO site that impacts millions of users.
Getting Started
The quickest way to get started is to get started with the Elder.js template using degit:
Step 1: Clone Template
npx degit Elderjs/template elderjs-app
cd elderjs-app
npm install # or yarn
Step 2: Start the Project
npm startNavigate to http://localhost:3000. You should see your app running.
This spawns a development server, so simply edit a file in src, save it, and reload the page to see your changes.
You can also see a live demo of this template: https://elderjs.pages.dev/
To Build HTML for Production:
npm run buildLet the build finish.
If you wish to preview you can use:
npx sirv-cli publicTo Run in SSR Mode for Production:
npm run serveElder.js Intro Video:
The talk below was given at Svelte Summit 2020 and is a great intro to the concepts behind Elder.js.
Why We Built Elder.js
When we set out to build elderguide.com we tested 6 different static site generators (Gatsby, Next.js, Nuxt.js, 11ty, Sapper and Hydrogen.js) and ultimately realized there wasn’t a solution that ticked all of our boxes.
On our journey, we had 3 major realizations:
- Most SSGs are built for either simple sites/blogs or for full scale "app frameworks" that have added an 'export' process added as an afterthought.
- Fetching data from multiple sources (dbs, apis, config files, markdown files) can lead to major code spaghetti.
- Client side routing adds a huge amount of complexity (and bundle size) to initial loads for very little SEO benefit. If you aren’t building an App, why would we want to fully hydrate our JS framework just for faster routing? Browsers are great at routing… we should only be hydrating things that need to be hydrated.
Initially, we decided to go with Sapper but hit major data roadblocks and issues unusable build times and development reload times.
In an afternoon of frustration, we whipped up a very rudimentary SSG with a complex and error prone process of adding Svelte components… but it worked. #productionready
After shipping ElderGuide.com to production, we were working on a refactor when a moment of genius from Kevin over at Svelte School prompted a major breakthrough that allowed us to use Svelte 100% for templating and still get partial hydration even though Svelte doesn’t support it.
After much consideration, we decided to open source the project so others could use it.
We can't wait to see what you build with it.
Elder.js Community Discord
Getting started with Elder.js and want to connect with other users? Join us over at the Elder.js channel within the official Svelte discord.
Routes
At the core of any site are its "routes" or templates.
In Elder.js a route is made up of 2 files that live in your route folder: ./src/routes/${routeName}/.
They are:
- A
route.jsfile. This is where you define route details such as the route’spermalinkdefinition,allfunction anddatafunction. - A Svelte component to be used as a template matches the
${routeName}; eg:./src/routes/blog/Blog.svelte(from here on out we refer to these specific Svelte components as "Svelte Templates")
Route.js
route.js files consist of a permalink definition, an all function, and a data function.
Elder.js uses "explicit routing" instead of the more common "parameter based" routing found in most frameworks like express.
At first, Elder.js' non-conventional routing can be intimidating, but it offers some major benefits discussed below while streamlining data flow in complex sites.
Let's look at an example of how you'd setup a route like /blog/:slug/ where there are only 2 blogposts.
// ./src/routes/blog/route.js
module.exports = {
  template: 'Blog.svelte',
  permalink: '/blog/:slug/'
  all: async () => {
    // The all function returns an array of all possible "request" objects for a route.
    // Here we are explicitly defining every possible variation of this route.
    return [{ slug: 'blogpost-1' }, {slug: 'blogpost-2'}],
  },
  data: async ({ request }) => {
  // The object returned here will be available in the Blog.svelte as the 'data' prop.
    return {
      blogpost: `This is the blogpost for the slug: ${request.slug}`.
    }
  },
  dynamic: false, // default.
};
Here is what is happening in plain English:
all(): This async function returns an array of all of therequestobjects for a given route. These are all of the pages that will be statically generated. Often this array may come from a data store but in this example, we're explicitly saying we only have 2 blog posts, so only two pages will be generated.permalink: The permalink is a standard route expression such as/blog/:slug/. If you want complete control permalink can be a function. Basically the permalink entry takesrequestobjects returned fromalland transform them into relative urls.data(): The data function prepares the data required in theBlog.sveltefile. Whatever object is returned will be available as thedataprop. In the example, we are just returning a static string, but you could also hit an external CMS, query a database, or read from the file system. Anything you can do in node, you can do here.dynamicthis controls whether in SSR mode if Elder.js should allow for parameters to be derived from the URL.
In this example, we're just returning a simple object in our data() function, but we could have easily used node-fetch and gotten our blogpost from a CMS or used fs to read from the filesystem:
const blogpost = await fetch(`https://api.mycms.com/getBySlug/${request.slug}/`).then((res) => res.json());Note: version 3 for the node-fetch library is a pure ESM package and no longer compatible with elderjs. Therefore make sure you install version 2 instead, for example with npm install node-fetch@^2.6.5. They will keep updating v2 with bug and security issues, see this issue for more details.
Dynamic Routing
As of Elder.js 1.4.0, dynamic routing is supported when Elder.js is used in SSR mode.
This means that the url parameters will be extracted from the url /:foo/:bar/ and made available to Elder.js.
To enable this functionality add dynamic: true to the corresponding route.js file.
Uses for Dynamic Routing
Dynamic routing is useful for logged-in experiences. This allows you to use Elder.js as flexibility as you would use any express app.
Within the data() function you have access to request.req and next() which are piped in directly from express or polka.
This allows you to use sessions and generate pages on the fly as you would with any app.
How Routing Differs from Express-like Frameworks
Elder.js' approach to routing gives you complete control offering several distinct advantages, the two biggest are:
- By allowing users to define
allof the requests a for a route, Elder.js' does not have to crawl all of the links of a site to know what pages need to be generated. This allows for fully parallelized build times that scale with CPU resources. (As of October 2020, ElderGuide.com has ~20k pages and builds in 1 minute 22 seconds.) - Users have full control over their URL structure. No complex regex is needed to have
/senior-living/:facilityId/and/senior-living/:articleId/and/senior-living/:parentCompanyId/. This also makes i18n and l10n much more approachable.
Route.js Best Practices:
With the simple route.js example out of the way, let's talk about best practices and let's look at a more complex example of a route.js file.
Best Practice: A route's all function should return the minimum viable data points needed to generate a page.
Skinny
requestobjects. Fatdatafunctions.
When people first encounter Elder.js, there is a strong temptation to load the request objects returned by a route's all function with tons of data.
While this approach works, it doesn't scale very well. Fetching, preparing, and processing data should be done in your data function.
That said, it is recommended that you only include the bare minimum required to query your database, api, file system, or data store on the request object. From there, do all of the data fetching, preparing, and organization in the route's data function.
Real World Example
To drive this point home and to show a more complex example of routing, imagine you're building a travel site that lists tourist attractions for major cities throughout the world.
You have a city route and for each page on that route you need 3 data points to query your API, database, or datastore in order to pull in all of the rest of the page's data.
These data points are:
- The language of the page being generated
- The City slug
- The Country slug
Here is what a minimal route.js would look like to support /en/spain/barcelona/ and /es/espana/barcelona/.
// ./src/routes/city/route.js
module.exports = {
  permalink: "/:lang/:country/:slug/",
  all: async () => {
    return [
      { slug: "barcelona", country: "spain", lang: "en" },
      { slug: "barcelona", country: "espana", lang: "es" },
    ];
  },
  data: async ({ request }) => {
    // discussed below.
  },
};
Problems with Fat Request Objects
Imagine for a moment that we attempted to include all of the additional details needed to generate the page for this route in our request objects like so:
module.exports = {
  permalink: '/:lang/:country/:slug/',
  all: async () => {
    return [
      { slug: 'barcelona', country: 'spain', lang: 'en', data: { hotels: 12, attractions: 14, promotions: ['English promotion'], ...lotsOfData } },
      { slug: 'barcelona', country: 'espana', lang: 'es' data: { hotels: 12, attractions: 14, promotions: ['Spanish promotion'], ...lotsOfData } }
    ]
  }
  // data function
}
Now imagine your data function looks like so and you're getting more data.
module.exports = {
  // permalink definition / function
  all: async () => {
    return [
      { slug: 'barcelona', country: 'spain', lang: 'en', data: { hotels: 12, attractions: 14, promotions: ['English promotion'], ...lotsOfData } },
      { slug: 'barcelona', country: 'espana', lang: 'es' data: { hotels: 12, attractions: 14, promotions: ['Spanish promotion'], ...lotsOfData } }
    ]
  },
  data:  async ({ request }) => {
    const hotels = [
        { ...hotel }, // imagine this has a lot of details
        { ...hotel },
        { ...hotel },
        { ...hotel },
        { ...hotel },
      ];

    // this will now be available in your svelte template as your 'data' param.
    // you could access all of the hotel details at `data.hotels`
    return {
      hotels,
    };
  },
}
With this implementation, you've now got both request and data objects in Svelte templates and you're asking yourself:
Should I be accessing
request.data.hotelsor justdata.hotels.lengthto get the number of hotels?
Save yourself this headache by remembering: skinny request objects, fat data functions.
Only store the minimum data needed on your request objects. Instead return all of the data required by the page from the data function.
Note: If you're interested in i18n please look at this issue as robust support could be offered by a community plugin.
Database Connections, APIs, and External Data Sources
The data function of each route is designed to be the central place to fetch data for a route but the implementation details are very open ended and up to you.
Just about anything you can do in Node.js, you can do in a data function.
That said, if you are hitting a DB and want to manage your connection in a reusable fashion, the recommended way of doing so is to populate the query object on the bootstrap hook.
Using this pattern allows you to share a database connection across the entire lifecycle of your Elder.js site.
Cache Data Where Possible Within Route.js Files
If you have a data heavy calculation required to generate a page, look into calculating that data and caching it before your module.exports definition like so:
// ./src/routes/city/route.js

// do heavy calculation here
// this prevents the data from being calculated each request
const cityLookupObject = {
   barcelona: {
   // lots of data.
  }
}

module.exports = {
  permalink: ({ request, settings }) =>
    `/${request.lang}/${request.country.slug}/${request.slug}/`, // because we want more control we use a function for our permalink.
  all: async () => {
    return [
      { slug: "barcelona", country: { slug: "spain" }, lang: "en" },
      { slug: "barcelona", country: { slug: "espana" }, lang: "es" },
    ];
  },
  data: async ({ request }) => {

    return {
      city: cityLookupObject[request.slug];
    }

  },
};
Data Used in Multiple Routes
If you have data that is used in multiple routes, you can share that data between routes by populating the data object on the bootstrap hook documented later in this guide.
Assuming you have populated the data.cities with an array of cities on the bootstrap hook, you could access it like so:
// ./src/routes/city/route.js
module.exports = {
  permalink: '/:slug/', // same as ({ request }) => `/${request.slug}/`,
  all: async ({ data }) => data.cities,
  data: async ({ request, data }) => {
    return {
      city: data.cities.find(city=> city.slug === request.slug);
    }

  },
};
Data defined in bootstrap is available on all routes.
all() Function Spec
Here is the function signature for a route.js all function:
all: async ({ settings, query, data, helpers }): Array<Object> => {
  // settings: this describes the Elder.js settings at initialization.
  // query: an empty object that is usually populated on the 'bootstrap' hook with a database connection or api connection. This is sharable throughout all hooks, functions, and shortcodes.
  // data: any data set on the 'bootstrap' hook.
  return Array<Object>;
}
permalink() Function Spec
IMPORTANT: If you are looking to use dynamic routing in SSR mode, you must use parameter based routing.
If you need more control over your urls than you can get with parameter based routing (/:slug/) you can use a function.
Here is the function signature for a route.js permalink function:
permalink: ({ request, settings, helpers }): String => {
  // NOTE: permalink must be sync. Async is not supported.

  // request: this is the object received from the all() function. Generally, we recommend passing a 'slug' parameter but you can use any naming you want.
  // settings: this describes the Elder.js bootstrap settings.
  // helpers: Elder.js helpers and user helpers from the ./src/helpers/index.js` file.
  // NOTE: You should avoid using helpers here as helpers.permalinks default helper (see below) doesn't support it.
  return String;
};
data() Function Spec
Whether you’re building a personal blog or complex data driven SEO site, a route's data function is the recommended place to fetch (from a db, api, or other source) and prepare data to be consumed by your Svelte templates.
Here is the function signature for a route.js data function:
data: async ({
  data, // any data set by plugins or hooks on the 'bootstrap' hook
  helpers, // Elder.js helpers and user helpers from the ./src/helpers/index.js` file.
  allRequests, // all of the `request` objects returned by a route's all() function.
  settings, // settings of Elder.js
  request, // the requested page's `request` object.
  errors, // any errors
  perf, // the performance helper.
  query, // search for 'query' in these docs for more details on it's use.
}): Object => {
  // data is any data set from plugins or hooks.
  return Object;
};
Hooks
Elder.js hooks are designed to be modular, sharable, and easily bundled in to Elder.js plugins for common use cases... while still giving developers of all skill levels an easy way to customize core page generation logic to their own needs.
For a full overview of the hooks available, you can reference the hookInterface.ts or the hooks list below.
In short, there is a hook at every major step of the page generation process from system bootstrap (the bootstrap hook) all the way to writing html to your computer (on the requestComplete hook).
This repo has a small list of common example hooks that you can use in your project: https://github.com/Elderjs/hooks/tree/main/hooks. Feel free to make a PR and add your hooks there.
The Goal of Elder.js Hooks
No project becomes a 'tangled mess' on day one. It happens over time.
You or someone on your team makes a small "hacky" fix.
This change was intended to be temporary but it falls off your team's radar.
Over time, these "hacky" fixes build up and slowly make a project hard to reason about and hard to work on.
The goal of Elder.js' hook implementation is that any changes that don't fit in a route.js file are instead aggregated in a single hooks.js file where anyone on a team will know to expect to find any hidden complexity.
The result of this approach is that of a project's hacky fixes are no longer scattered across a project, but instead live in a single self documenting location where users have complete but predictable control over the Elder.js page generation process.
The added benefit is that plugins can also tap into these hooks offering sharable functionality.
Hook Interface: the mutable and props Arrays
Each Elder.js hook explicitly defines which props are available to a function registered on a hook along with which of those props are mutable by that function.
This defines the "contract" that Elder.js' hook interface implements.
propsrepresents the parameters that are available to a function registered on a hook.mutablerepresents which of thepropscan be changed on a specific hook.
This structure was implemented to keep mutation and side effects predictable.
Under the hood, all items in the
propsarray that aren't in themutablearray are passed as a Proxy.
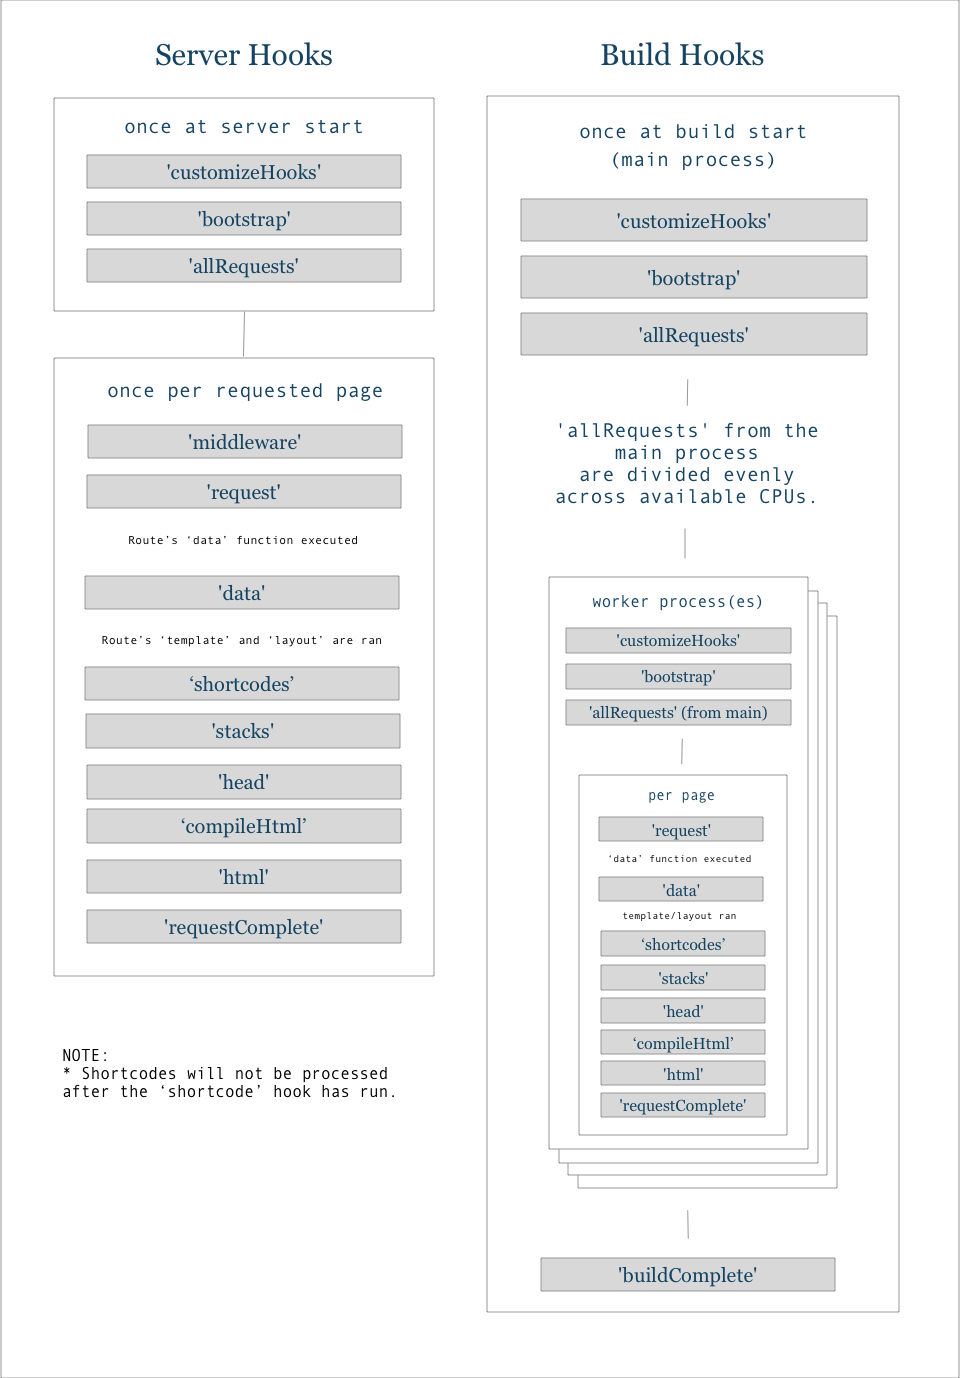
Hook Lifecycle
Hook List
customizeHooks
ExperimentalUsed to modify what hooks can mutate which properties all hooks.
-
perf
Includes two functions: perf.start('thingToTrack') and perf.end('thingToTrack') which allows easily adding tracking to Elder.js' perf reporting which can be toggled under debug.performance in your elder.config.js file.
-
hookInterface
The hook interface is what defines the 'contract' for each hook. It includes what properties the hook has access to and which of those properties can be mutated.
-
errors
An array of errors collected during the build process.
-
hookInterface
The hook interface is what defines the 'contract' for each hook. It includes what properties the hook has access to and which of those properties can be mutated.
-
errors
An array of errors collected during the build process.
This hook receives the hookInterface.ts file which defines all hook interactions. You can customize all 'props' and 'mutable' of all hooks by using this hook. This is a power user hook and unless you know Elder.js internals don't mess with it.
Advanced Hook: This hook is designed for plugins and power users who want to custom Elder.js beyond the common use cases.
Location: Elder.ts
bootstrap
StableRoutes, plugins, and hooks have been collected and validated.
-
perf
Includes two functions: perf.start('thingToTrack') and perf.end('thingToTrack') which allows easily adding tracking to Elder.js' perf reporting which can be toggled under debug.performance in your elder.config.js file.
-
helpers
An object of helpers loaded from `./src/helpers/index.js` in addition to the Elder.js provided helper functions.
-
data
An object that is passed to Svelte templates as the 'data' prop.
-
settings
An object representing the elder.config.js and other details about the build.
-
routes
An object that represents all of the routes registered with Elder.js.
-
hooks
An array of all of the hooks that have been validated by Elder.js.
-
query
An object that is initially empty but is reserved for plugins and sites to add database or api access to.
-
errors
An array of errors collected during the build process.
-
errors
An array of errors collected during the build process.
-
helpers
An object of helpers loaded from `./src/helpers/index.js` in addition to the Elder.js provided helper functions.
-
data
An object that is passed to Svelte templates as the 'data' prop.
-
settings
An object representing the elder.config.js and other details about the build.
-
query
An object that is initially empty but is reserved for plugins and sites to add database or api access to.
- Often used to populate the empty query object with a database or API connection as query is passed to the all() function which is used to generate request objects.
- Internally used to automatically populate the helpers object with the helpers found in './src/helpers/index.js'.
- Can be used to set information on the data object that is needed throughout the entire lifecycle. (sitewide settings)
Location: Elder.ts
allRequests
StableallRequests which represents all of the request objects have been collected from route and plugins. This makes the 'allRequests' array mutable.
-
perf
Includes two functions: perf.start('thingToTrack') and perf.end('thingToTrack') which allows easily adding tracking to Elder.js' perf reporting which can be toggled under debug.performance in your elder.config.js file.
-
helpers
An object of helpers loaded from `./src/helpers/index.js` in addition to the Elder.js provided helper functions.
-
data
An object that is passed to Svelte templates as the 'data' prop.
-
settings
An object representing the elder.config.js and other details about the build.
-
allRequests
Every request object collected from all routes during bootstrap. It is important to note that 'allRequests' will be different at the 'request' hook during a build because the requests are split between different processes during build time using the allRequests object.
-
routes
An object that represents all of the routes registered with Elder.js.
-
query
An object that is initially empty but is reserved for plugins and sites to add database or api access to.
-
errors
An array of errors collected during the build process.
-
errors
An array of errors collected during the build process.
-
allRequests
Every request object collected from all routes during bootstrap. It is important to note that 'allRequests' will be different at the 'request' hook during a build because the requests are split between different processes during build time using the allRequests object.
The main use here is to allow users to adjust the requests that Elder.js is aware of.
- This could be used for incremental builds. By filtering and overwriting the allRequests array building just a single route or even a single request is doable.
- This hook is used by elderjs-plugin-random to register temporary requests that it later intercepts to redirect to a random page of a route.
- This hook is used by elderjs-plugin-markdown to register processed markdown files and their slugs Elder.js
NOTE: If you are modifying 'allRequests' you must set 'request.route' key for each request.
Location: Elder.ts
middleware
StableFired upon a request that originates from the express/polka middleware version of Elder.js. The hook has access to "req" and "next" common in express like middleware.
-
perf
Includes two functions: perf.start('thingToTrack') and perf.end('thingToTrack') which allows easily adding tracking to Elder.js' perf reporting which can be toggled under debug.performance in your elder.config.js file.
-
errors
An array of errors collected during the build process.
-
query
An object that is initially empty but is reserved for plugins and sites to add database or api access to.
-
helpers
An object of helpers loaded from `./src/helpers/index.js` in addition to the Elder.js provided helper functions.
-
data
An object that is passed to Svelte templates as the 'data' prop.
-
settings
An object representing the elder.config.js and other details about the build.
-
allRequests
Every request object collected from all routes during bootstrap. It is important to note that 'allRequests' will be different at the 'request' hook during a build because the requests are split between different processes during build time using the allRequests object.
-
routes
An object that represents all of the routes registered with Elder.js.
-
req
The 'req' object from Express or Polka when Elder.js is being used as a server.
-
next
The 'next' object from Express or Polka when Elder.js is being used as a server.
-
res
The 'res' object from Express or Polka when Elder.js is being used as a server.
-
serverLookupObject
A key value object where the key is the relative permalink and the object is the 'request' object used by the Elder.js server.
-
runHook
The function that powers hooks. 'await runhook('hookName', objectContainingProps)
-
shortcodes
An array of shortcode definitions that are processed on the 'shortcodes' hook.
-
request
An object that represents the parameters required to generate a specific page on a specific route. This object originating from the all() query of a route.js file.
-
router
The Elder.js router that handles dynamic requests and explicit requests
-
errors
An array of errors collected during the build process.
-
query
An object that is initially empty but is reserved for plugins and sites to add database or api access to.
-
helpers
An object of helpers loaded from `./src/helpers/index.js` in addition to the Elder.js provided helper functions.
-
data
An object that is passed to Svelte templates as the 'data' prop.
-
settings
An object representing the elder.config.js and other details about the build.
-
allRequests
Every request object collected from all routes during bootstrap. It is important to note that 'allRequests' will be different at the 'request' hook during a build because the requests are split between different processes during build time using the allRequests object.
-
routes
An object that represents all of the routes registered with Elder.js.
-
req
The 'req' object from Express or Polka when Elder.js is being used as a server.
-
next
The 'next' object from Express or Polka when Elder.js is being used as a server.
-
res
The 'res' object from Express or Polka when Elder.js is being used as a server.
-
request
An object that represents the parameters required to generate a specific page on a specific route. This object originating from the all() query of a route.js file.
-
serverLookupObject
A key value object where the key is the relative permalink and the object is the 'request' object used by the Elder.js server.
If you're looking to use Elder.js with express/polka to build a server rendered website, then you'll be interested in this hook as it includes the familiar 'req' and 'next' objects as often used in Express middleware.
- Under the hood Elder.js uses this hook to power the server implementation.
- If you want to change the route of a request, you can do so by modifying the 'request.route' to the name of the new request, and it will be picked up by the default Elder.js server.
- If you're looking to set user or session information stored on the 'req' prop we recommend using a hook to modify the 'request' object or 'data' objects. Change to the request object will be passed down.
- If you're looking to pass in details about the query string deeper into your application, you could use this hook to do so.
- Anything you'd use an Express 'req' or 'next' for you can do and customize other parts of the Elder.js on this hook.
Advanced Hook: This hook is designed for plugins and power users who want to custom Elder.js beyond the common use cases.
Location: prepareServer.ts
request
StableThis is executed at the beginning the request object being processed.
-
perf
Includes two functions: perf.start('thingToTrack') and perf.end('thingToTrack') which allows easily adding tracking to Elder.js' perf reporting which can be toggled under debug.performance in your elder.config.js file.
-
helpers
An object of helpers loaded from `./src/helpers/index.js` in addition to the Elder.js provided helper functions.
-
data
An object that is passed to Svelte templates as the 'data' prop.
-
settings
An object representing the elder.config.js and other details about the build.
-
request
An object that represents the parameters required to generate a specific page on a specific route. This object originating from the all() query of a route.js file.
-
allRequests
Every request object collected from all routes during bootstrap. It is important to note that 'allRequests' will be different at the 'request' hook during a build because the requests are split between different processes during build time using the allRequests object.
-
query
An object that is initially empty but is reserved for plugins and sites to add database or api access to.
-
errors
An array of errors collected during the build process.
-
routes
An object that represents all of the routes registered with Elder.js.
-
route
An object representing the specific route (similar to a route.js file) for a specific request.
-
errors
An array of errors collected during the build process.
-
helpers
An object of helpers loaded from `./src/helpers/index.js` in addition to the Elder.js provided helper functions.
-
data
An object that is passed to Svelte templates as the 'data' prop.
-
settings
An object representing the elder.config.js and other details about the build.
-
request
An object that represents the parameters required to generate a specific page on a specific route. This object originating from the all() query of a route.js file.
-
route
An object representing the specific route (similar to a route.js file) for a specific request.
This hook gives access to the entire state of a request lifecycle before it starts.
- Primarily used to set 'request' specific data that is required by all routes so doesn't make sense to share across multiple 'data' functions.
- If you have helper functions that need a closure isolated to a specific page generation lifecycle here is where you should attach them.
- If you need to programmatically change the route, you can do so here. This is how the elderjs-plugin-random works.
- This hook is commonly uses by plugins that need to add route level data that is dependent on the request to populate.
Location: Page.ts
data
StableThis hook is run after the route's "data" function has executed.
-
perf
Includes two functions: perf.start('thingToTrack') and perf.end('thingToTrack') which allows easily adding tracking to Elder.js' perf reporting which can be toggled under debug.performance in your elder.config.js file.
-
data
An object that is passed to Svelte templates as the 'data' prop.
-
request
An object that represents the parameters required to generate a specific page on a specific route. This object originating from the all() query of a route.js file.
-
errors
An array of errors collected during the build process.
-
helpers
An object of helpers loaded from `./src/helpers/index.js` in addition to the Elder.js provided helper functions.
-
query
An object that is initially empty but is reserved for plugins and sites to add database or api access to.
-
routes
An object that represents all of the routes registered with Elder.js.
-
cssStack
A 'stack' of strings to be merged together to create the the cssString prop. This is mainly uses to collect the css strings emitted by SSR'd Svelte files.
-
headStack
A 'stack' of strings to be merged together (along with cssStack) that are written to the tag. If you are looking to customize the head you're probably better looking at the 'headString.'
-
beforeHydrateStack
A 'stack' of generally JS script tags that are required to be loaded before a Svelte component is hydrated. This is only written to the page when a Svelte component needs to be hydrated.
-
hydrateStack
A 'stack' Svelte components that will be hydrated.
-
customJsStack
A 'stack' of user specific customJs strings that will to be merged together. This is written after the Svelte components.
-
footerStack
A 'stack' of strings to be merged together that will be added to the footer tag.
-
settings
An object representing the elder.config.js and other details about the build.
-
next
The 'next' object from Express or Polka when Elder.js is being used as a server.
-
errors
An array of errors collected during the build process.
-
data
An object that is passed to Svelte templates as the 'data' prop.
-
cssStack
A 'stack' of strings to be merged together to create the the cssString prop. This is mainly uses to collect the css strings emitted by SSR'd Svelte files.
-
headStack
A 'stack' of strings to be merged together (along with cssStack) that are written to the tag. If you are looking to customize the head you're probably better looking at the 'headString.'
-
beforeHydrateStack
A 'stack' of generally JS script tags that are required to be loaded before a Svelte component is hydrated. This is only written to the page when a Svelte component needs to be hydrated.
-
hydrateStack
A 'stack' Svelte components that will be hydrated.
-
customJsStack
A 'stack' of user specific customJs strings that will to be merged together. This is written after the Svelte components.
-
footerStack
A 'stack' of strings to be merged together that will be added to the footer tag.
This hook is mainly used by plugins/hooks to offer functionality at the route level that is dependent on the route's "data" function has returning but isn't suitable to live in multiple data function across many routes due to code duplication.
Examples of things we (ElderGuide.com) have done or have seen users do:
- LD+JSON: Plugins/hooks that add LD+JSON may need the a route's "data" function to be executed before they have the data needed to run.
- Breadcrumbs: Plugins/hooks that add breadcrumbs may be dependent on the "data" function of a route.
- Table Of Contents: Plugins/hooks that automatically generate a table of contents will be dependent on data from a route's data function.
- Reference Plugins: Plugins/hooks that collect references from content and add them to the footer of the page content.
- Last Updated Data: Determining the last updated date for a page is often better to do in a central place instead of in many "data" functions.
Stacks are made available here so that strings can be added to the head or footer of the page easily.
Advanced Hook: This hook is designed for plugins and power users who want to custom Elder.js beyond the common use cases.
Location: Page.ts
shortcodes
StableExecuted after the route's html has been compiled, but before the layout html has been compiled.
-
perf
Includes two functions: perf.start('thingToTrack') and perf.end('thingToTrack') which allows easily adding tracking to Elder.js' perf reporting which can be toggled under debug.performance in your elder.config.js file.
-
helpers
An object of helpers loaded from `./src/helpers/index.js` in addition to the Elder.js provided helper functions.
-
data
An object that is passed to Svelte templates as the 'data' prop.
-
settings
An object representing the elder.config.js and other details about the build.
-
request
An object that represents the parameters required to generate a specific page on a specific route. This object originating from the all() query of a route.js file.
-
query
An object that is initially empty but is reserved for plugins and sites to add database or api access to.
-
errors
An array of errors collected during the build process.
-
cssStack
A 'stack' of strings to be merged together to create the the cssString prop. This is mainly uses to collect the css strings emitted by SSR'd Svelte files.
-
headStack
A 'stack' of strings to be merged together (along with cssStack) that are written to the tag. If you are looking to customize the head you're probably better looking at the 'headString.'
-
customJsStack
A 'stack' of user specific customJs strings that will to be merged together. This is written after the Svelte components.
-
layoutHtml
The compiled HTML response for a route containing all of the HTML from the Route's layout and template.
-
shortcodes
An array of shortcode definitions that are processed on the 'shortcodes' hook.
-
allRequests
Every request object collected from all routes during bootstrap. It is important to note that 'allRequests' will be different at the 'request' hook during a build because the requests are split between different processes during build time using the allRequests object.
-
errors
An array of errors collected during the build process.
-
layoutHtml
The compiled HTML response for a route containing all of the HTML from the Route's layout and template.
-
cssStack
A 'stack' of strings to be merged together to create the the cssString prop. This is mainly uses to collect the css strings emitted by SSR'd Svelte files.
-
headStack
A 'stack' of strings to be merged together (along with cssStack) that are written to the tag. If you are looking to customize the head you're probably better looking at the 'headString.'
-
customJsStack
A 'stack' of user specific customJs strings that will to be merged together. This is written after the Svelte components.
Elder.js uses this hook to process shortcodes. The vast majority of users won't need to use this hook, but if you were so inclined you could write your own shortcode parser or if you'd like to disable shortcodes completely, you can add 'elderProcessShortcodes' to hooks.disable in your elder.config.js file.
NOTE: Don't use this hook for anything besides shortcodes.
Advanced Hook: This hook is designed for plugins and power users who want to custom Elder.js beyond the common use cases.
Location: Page.ts
stacks
StableExecuted just before processing all of the stacks into strings.
-
perf
Includes two functions: perf.start('thingToTrack') and perf.end('thingToTrack') which allows easily adding tracking to Elder.js' perf reporting which can be toggled under debug.performance in your elder.config.js file.
-
helpers
An object of helpers loaded from `./src/helpers/index.js` in addition to the Elder.js provided helper functions.
-
data
An object that is passed to Svelte templates as the 'data' prop.
-
settings
An object representing the elder.config.js and other details about the build.
-
request
An object that represents the parameters required to generate a specific page on a specific route. This object originating from the all() query of a route.js file.
-
query
An object that is initially empty but is reserved for plugins and sites to add database or api access to.
-
errors
An array of errors collected during the build process.
-
cssStack
A 'stack' of strings to be merged together to create the the cssString prop. This is mainly uses to collect the css strings emitted by SSR'd Svelte files.
-
htmlAttributesStack
A 'stack' of attributes to be merged together that are written to the tag.By default, it containt '{lang: 'en'}' or an other lang set in your elder.config.js
-
bodyAttributesStack
A 'stack' of attributes to be merged together that are written to the tag.
-
headStack
A 'stack' of strings to be merged together (along with cssStack) that are written to the tag. If you are looking to customize the head you're probably better looking at the 'headString.'
-
beforeHydrateStack
A 'stack' of generally JS script tags that are required to be loaded before a Svelte component is hydrated. This is only written to the page when a Svelte component needs to be hydrated.
-
hydrateStack
A 'stack' Svelte components that will be hydrated.
-
customJsStack
A 'stack' of user specific customJs strings that will to be merged together. This is written after the Svelte components.
-
footerStack
A 'stack' of strings to be merged together that will be added to the footer tag.
-
errors
An array of errors collected during the build process.
-
cssStack
A 'stack' of strings to be merged together to create the the cssString prop. This is mainly uses to collect the css strings emitted by SSR'd Svelte files.
-
htmlAttributesStack
A 'stack' of attributes to be merged together that are written to the tag.By default, it containt '{lang: 'en'}' or an other lang set in your elder.config.js
-
bodyAttributesStack
A 'stack' of attributes to be merged together that are written to the tag.
-
headStack
A 'stack' of strings to be merged together (along with cssStack) that are written to the tag. If you are looking to customize the head you're probably better looking at the 'headString.'
-
beforeHydrateStack
A 'stack' of generally JS script tags that are required to be loaded before a Svelte component is hydrated. This is only written to the page when a Svelte component needs to be hydrated.
-
hydrateStack
A 'stack' Svelte components that will be hydrated.
-
customJsStack
A 'stack' of user specific customJs strings that will to be merged together. This is written after the Svelte components.
-
footerStack
A 'stack' of strings to be merged together that will be added to the footer tag.
Elder.js uses 'stacks' to manage it's string concatenation. If you are unfamiliar, stacks are basically an array of strings, with a priority, and some meta data. This hook let's you manipulate or view the stacks before they are written to the page and is designed for use by plugins.
This hook will mainly be used when you need to add arbitrary strings to the footer. In most cases, users should be using <svelte:head></svelte:head> to add content to the head.
- headStack: Internally all content used in
- cssStack: The 'cssStack' represents all of the css strings added by hooks and plugins. Plugins can add css here (our in the head stack if you need to add CSS before the Elder.js CSS file), but we recommend users add them directly in Svelte files. Note: Do not wrap strings added to the stack in <style></style>.
- beforeHydrateStack: Polyfills for hydration could be added here. This stack is not run unless there are Svelte components to be hydrated.
- hydrateStack: the hydrateStack contains strings which represent all of the root svelte components which will be hydrated.
- customJsStack: Used to add custom JS to the site. This is done after the Svelte components are written to the page.
- footerStack: the footerStack which is an array of html or html friendly strings that will be written to the footer. This is generally the ideal place for plugins to add Analytics scripts as it fires after all other JS.
Advanced Hook: This hook is designed for plugins and power users who want to custom Elder.js beyond the common use cases.
Location: Page.ts
head
StableExecuted just before writing the tag to the page.
-
perf
Includes two functions: perf.start('thingToTrack') and perf.end('thingToTrack') which allows easily adding tracking to Elder.js' perf reporting which can be toggled under debug.performance in your elder.config.js file.
-
helpers
An object of helpers loaded from `./src/helpers/index.js` in addition to the Elder.js provided helper functions.
-
data
An object that is passed to Svelte templates as the 'data' prop.
-
settings
An object representing the elder.config.js and other details about the build.
-
request
An object that represents the parameters required to generate a specific page on a specific route. This object originating from the all() query of a route.js file.
-
headString
The complete string just before it is written to the head.
-
query
An object that is initially empty but is reserved for plugins and sites to add database or api access to.
-
errors
An array of errors collected during the build process.
-
errors
An array of errors collected during the build process.
-
headString
The complete string just before it is written to the head.
This hook's headSting represents everything that will be written to <head> tag.
There are many possible SEO uses to this hook, especially for plugins. That said, we recommend users who want to set common SEO elements such as tags <title> and meta descriptions programmatically to do it from within Svelte templates using the <svelte:head></svelte:head> tag. Chances are you won't need this field unless you're a power user and need access to the raw head.
Advanced Hook: This hook is designed for plugins and power users who want to custom Elder.js beyond the common use cases.
Location: Page.ts
compileHtml
StableThis is where Elder.js merges the html from the Svelte layout with stacks and wraps it in an tag.
-
perf
Includes two functions: perf.start('thingToTrack') and perf.end('thingToTrack') which allows easily adding tracking to Elder.js' perf reporting which can be toggled under debug.performance in your elder.config.js file.
-
helpers
An object of helpers loaded from `./src/helpers/index.js` in addition to the Elder.js provided helper functions.
-
data
An object that is passed to Svelte templates as the 'data' prop.
-
settings
An object representing the elder.config.js and other details about the build.
-
htmlAttributesString
The complete html attributes as a string just before it is written.
-
bodyAttributesString
Body attributes as a string just before it is written.
-
request
An object that represents the parameters required to generate a specific page on a specific route. This object originating from the all() query of a route.js file.
-
headString
The complete string just before it is written to the head.
-
footerString
A HTML string that Elder.js will write to the footer.
-
layoutHtml
The compiled HTML response for a route containing all of the HTML from the Route's layout and template.
-
htmlString
The fully generated html for the page.
-
errors
An array of errors collected during the build process.
-
htmlString
The fully generated html for the page.
This hook should only be used when you need to have full control over the <html> document. Make sure if you use this to add 'elderCompileHtml' to the 'hooks.disable' array in your elder.config.js or your template will be overwritten.
Advanced Hook: This hook is designed for plugins and power users who want to custom Elder.js beyond the common use cases.
Location: Page.ts
html
StableExecuted when all of the html has been compiled.
-
perf
Includes two functions: perf.start('thingToTrack') and perf.end('thingToTrack') which allows easily adding tracking to Elder.js' perf reporting which can be toggled under debug.performance in your elder.config.js file.
-
helpers
An object of helpers loaded from `./src/helpers/index.js` in addition to the Elder.js provided helper functions.
-
data
An object that is passed to Svelte templates as the 'data' prop.
-
settings
An object representing the elder.config.js and other details about the build.
-
request
An object that represents the parameters required to generate a specific page on a specific route. This object originating from the all() query of a route.js file.
-
htmlString
The fully generated html for the page.
-
query
An object that is initially empty but is reserved for plugins and sites to add database or api access to.
-
errors
An array of errors collected during the build process.
-
errors
An array of errors collected during the build process.
-
htmlString
The fully generated html for the page.
This hook receives the full html of the document. With great power comes great responsibility.
- Can be used to compress the html/css/js.
- Could be used to programmatically extract h2/h3 tags and build/inject a table of contents with something like Cheeriojs.
- If you need to modify the final html output, here is where you can do it.
Location: Page.ts
requestComplete
StableThis hook marks the end of the request lifecycle.
-
perf
Includes two functions: perf.start('thingToTrack') and perf.end('thingToTrack') which allows easily adding tracking to Elder.js' perf reporting which can be toggled under debug.performance in your elder.config.js file.
-
request
An object that represents the parameters required to generate a specific page on a specific route. This object originating from the all() query of a route.js file.
-
htmlString
The fully generated html for the page.
-
query
An object that is initially empty but is reserved for plugins and sites to add database or api access to.
-
settings
An object representing the elder.config.js and other details about the build.
-
errors
An array of errors collected during the build process.
-
timings
An array of collected timings of the system. These are collected using the performance observer.
-
data
An object that is passed to Svelte templates as the 'data' prop.
-
errors
An array of errors collected during the build process.
This hook is triggered on an individual 'request object' completing whether Elder.js is being used in the "build" or a "server" mode.
- Internally, Elder.js uses this hook to write html to the "public folder".
- Useful for uploading static html to s3 or another source.
- Could also be used to write the output of a route's "data" function file to help with client site routing if you were so inclined.
- This hook may also be used by plugins to clean up any request specific 'state' they have stored.
- By default Elder.js adds a hook here to all server requests that outputs how long the request took to generate. If you want to see detailed output from this hook set debug.speed = true in your config file.
Location: Page.ts
error
StableExecuted only if the script has encountered errors and they are pushed to the errors array.
-
perf
Includes two functions: perf.start('thingToTrack') and perf.end('thingToTrack') which allows easily adding tracking to Elder.js' perf reporting which can be toggled under debug.performance in your elder.config.js file.
-
helpers
An object of helpers loaded from `./src/helpers/index.js` in addition to the Elder.js provided helper functions.
-
data
An object that is passed to Svelte templates as the 'data' prop.
-
settings
An object representing the elder.config.js and other details about the build.
-
request
An object that represents the parameters required to generate a specific page on a specific route. This object originating from the all() query of a route.js file.
-
query
An object that is initially empty but is reserved for plugins and sites to add database or api access to.
-
errors
An array of errors collected during the build process.
As the script encounters errors, they are collected and presented on this hook at the end of a request and the end of an entire build.
Location: Page.ts, build.ts
buildComplete
StableExecuted after a build is complete
-
perf
Includes two functions: perf.start('thingToTrack') and perf.end('thingToTrack') which allows easily adding tracking to Elder.js' perf reporting which can be toggled under debug.performance in your elder.config.js file.
-
helpers
An object of helpers loaded from `./src/helpers/index.js` in addition to the Elder.js provided helper functions.
-
data
An object that is passed to Svelte templates as the 'data' prop.
-
settings
An object representing the elder.config.js and other details about the build.
-
timings
An array of collected timings of the system. These are collected using the performance observer.
-
query
An object that is initially empty but is reserved for plugins and sites to add database or api access to.
-
errors
An array of errors collected during the build process.
-
routes
An object that represents all of the routes registered with Elder.js.
-
allRequests
Every request object collected from all routes during bootstrap. It is important to note that 'allRequests' will be different at the 'request' hook during a build because the requests are split between different processes during build time using the allRequests object.
Contains whether the build was successful. If not it contains errors for the entire build. Also includes average performance details, and a granular performance object. Could be used to fire off additional scripts such as generating a sitemap or copying asset files to the public folder.
Plugins: Because builds are split across processes, a plugin doesn't not have a shared memory space across all processes.
Location: build.ts
Hook Example 1: bootstrap
Here is the bootstrap hook from the hookInterface.ts file.
// From hookInterface.ts
{
  "hook": "bootstrap",
  "props": [
    "perf",
    "helpers",
    "data",
    "settings",
    "routes",
    "hooks",
    "query",
    "errors"
  ],
  "mutable": [
    "errors",
    "helpers",
    "data",
    "settings",
    "query"
  ],
  "context": "Routes, plugins, and hooks have been collected and validated.",
  "use": "<ul>\n  <li>Often used to populate the empty query object with a database or API connection as query is passed to the all() function which is used to generate request objects.</li>\n  <li>Internally used to automatically populate the helpers object with the helpers found in './src/helpers/index.js'.</li>\n  <li>Can be used to set information on the data object that is needed throughout the entire lifecycle. (sitewide settings)</li>\n  </ul>",
  "location": "Elder.ts",
  "experimental": false,
  "advanced": false
};
This hook is executed after Elder.js has bootstrapped itself and lets users run arbitrary functions at that point too.
Internally, Elder.js uses this hook to automatically add any user defined helpers from ./src/helpers/index.js to the helpers prop which is available in other hooks, Svelte templates, and data functions.
Fetching External Data
// ./src/hooks.js
const fetch = require('node-fetch'); // node-fetch@^2.6.5
module.exports = [
  {
    hook: 'bootstrap',
    name: 'addExternalData',
    description: 'Adds arbitrary external data to the data object available in all hooks and routes.',
    run: async ({ settings, data }) => {
      const externalData = await fetch('https://yourapi.here').then((res) => res.json());
      return {
        data: {
          ...data,
          externalData, // this data is now available in the `all` and `data` functions of your `/routes/routeName/route.js`.
        },
      };
    },
  },
};
Adding DB to the query Object
Here is what a simple hook defined in your ./src/hook.js file might look like if you wanted to add a database connection to the query object which is available every time a hook is called:
// ./src/hooks.js
const db = require('../db');
module.exports = [
  {
    hook: 'bootstrap',
    name: 'addDbToQuery',
    description: 'Adds our db object to the query object',
    priority: 99,  // higher is more important. Since we want to be able to use the DB in other hooks that may be on the bootstrap hook, higher is better.
    run: async ({ query }) => {
      return {
        query: { ...query, db },
      };
    },
  },
};
In plain english:
addDbToQuery runs on the bootstrap hook and adds the db object as a key to the query object.
If you wanted to initialize a database connection and make it available on all hooks and in data functions, this is how you'd do it.
Where to Organize Hooks
USER HOOKS:
We recommend you define all of your hooks in your ./src/hooks.js file.
It is also recommended that you organize them to be sequential with hook execution as shown above.
If you need to limit a function to only run on a specific route, you can do so by using request.route === 'routeName'.
Note: If you're finding your
./src/hooks.jsis becoming too big, resist the urge as long as possible to split it into sub files. We've found that even with 20+ hooks, as long as they are organized sequential to match hook execution, things stay maintainable.
SYSTEM HOOKS:
Under the hood, all of the hooks Elder.js runs are defined in the @elderjs/elderjs ./src/hooks/index.ts.
They can be disabled by adding the hook name to the hooks.disable array in your elder.config.js.
  // elder.config.js
  ...
  hooks: {
    disable: ['elderWriteHtmlFileToPublic'], // this is used to disable internal hooks. Adding this would disabled writing your files on build.
  }
  ...
Plugins
Plugins are prepackaged hooks and/or routes that can be used to add additional functionality to an Elder.js site.
Plugins also have the added bonus of having their own isolated closure scope where they can store data between hooks invocations.
To use a plugin, it must be registered in your elder.config.js and can be loaded from ./src/plugins/${pluginName}/index.js or from the entry point to an npm package ./node_modules/${pluginName}/
Official Plugins:
- SEO-Check Easily check the HTML generated by Elder.js for over 50 common SEO issues.
- Images Easily add and manage responsive images with your Elder.js website.
- Markdown An extensible markdown parser for Elder.js powered by remark. Take a folder of markdown and automatically populate your route's
dataobject. - Critical Path CSS Quickly and easily generate and include critical path css for your Elder.js website.
- Sitemap Automatically generate the latest sitemap for your Elder.js website on build.
- Browser Reload Reload the browser when your Elder.js server restarts.
- References Easily add wikipedia style references to your content with
refandreferenceListshortcodes. - Random Easily preview a random page of a route by visiting a single url speeding up design and debugging of large sites.
Other Plugin Ideas:
- Want to upload your statically generated files to S3? Perfect use case for a plugin. (See plugin example below)
- RSS feed plugin
Writing Your Own Plugin
If you're looking to write your own plugin for Elder.js, we've setup an easy template to clone.
Here is the command you can use to clone it locally without all of the git history using degit.
npx degit Elderjs/plugin-template elderjs-plugin
cd elderjs-plugin
Plugin Example 1: S3 Upload
Here is what a plugin looks like:
const plugin: PluginOptions = {
  name: "elder-plugin-upload-s3",
  description: "Uploads html and/or data.json file to s3",
  minimumElderjsVersion: "1.4.13", // minimum required Elder.js version. You can leave blank.
  init: (plugin) => {
    // console.log(plugin); => returns this plugin object.
    plugin.data = { test: true };
    // NOTE! any data added in any hook or in the init function will
    // be persisted for the entire lifecycle of elder.js
    // this means the closure persists between server.js loads AND between pages during build.
    // Temporary data can be stored on this object,
    // but it is up to the plugin to clean up after itself and manage its own state.
    return plugin;
  },
  hooks: [
    {
      hook: "requestComplete",
      name: "uploadDataObjectToS3",
      description: "Uploads a data.json file to s3",
      priority: 1, // we want it to be last
      run: async ({ data, settings, request, plugin }) => {
        // console.log(plugin.test) => true
        if (settings.build === true && settings.deploy === true) {
          if (plugin.config.dataBucket && plugin.config.dataBucket.length > 0) {
            let dest = `${request.permalink.replace(/^\/+/, "")}data.json`;
            if (plugin.config.deployId) {
              dest = `${plugin.config.deployId}/${dest}`;
            }
            await s3Helper.uploadToS3(dest, JSON.stringify(data), "application/json", plugin.config.dataBucket);
          }
        }
      },
    },
    {
      hook: "requestComplete",
      name: "uploadHtmlToS3",
      description: "Uploads a html file to s3 bucket.",
      priority: 1, // we want it to be last
      run: async ({ settings, request, html, plugin }) => {
        if (settings.build === true && settings.deploy === true) {
          if (plugin.config.dataBucket && plugin.config.htmlBucket.length > 0) {
            let dest = `${request.permalink.replace(/^\/+/, "")}index.html`;
            if (plugin.config.deployId) {
              dest = `${plugin.config.deployId}/${dest}`;
            }

            await s3Helper.uploadToS3(dest, html, "text/html", plugin.config.htmlBucket);
          }
        }
      },
    },
  ],
  config: {
    dataBucket: process.env.AWS_S3_DATA_BUCKET || "",
    htmlBucket: process.env.AWS_S3_BUCKET || "",
    deployId: process.env.DEPLOY_ID || false,
  },
};
This plugin registers function executions on two hooks, the dataComplete hook and the requestComplete hook. In each, it uploads the data or html to the s3 bucket specified in the user's elder.config.js.
Svelte
Within Elder.js, there is a subtle distinction between how different Svelte files are compiled.
- Svelte Components live in your
./src/components/folder and are called from within Svelte Templates and Svelte Layouts. (eg:./src/components/Widget/Widget.svelte) - Svelte Templates are defined for each route (eg:
./src/routes/blog/Blog.svelte) and are only rendered on the server because they receive props ofdata,helpers,request, andsettings. - Svelte Layouts live in your
./src/layouts/folder and are only rendered on the server because they receive props ofdata,helpers,request,settings, andtemplateHtml.
While this may seem complex, the reasoning for Svelte Templates and Svelte Layouts only being server rendered is because they receive sensitive props that may contain data you don't want written in your html. (database credentials, env variables, auth keys, etc)
On a practical level, most of your Svelte files will live in your ./src/components/ folder and you can hydrate them from within Svelte Templates or Svelte Layouts as defined below.
Partial Hydration
Elder.js give you fine grained control over what parts of your site are "hydrated" on the client and which aren't.
If you aren't sure what should be hydrated and what shouldn't, the general rule of thumb is that if a component needs to be interactive on the client, you need to hydrate it.
To hydrate a component, simply use the following markup in either your Svelte Template or Svelte Layout files. (eg: ./src/routes/blog/Blog.svelte or ./src/layouts/Layout.svelte)
// within any Svelte template
 <MyComponent hydrate-client={{somethingCool: true}} />
In this example, the component MyComponent will receive the props of somethingCool = true which you'd access from within the component like so:
<!-- ./src/components/MyComponent.svelte -->
<script>
  export let somethingCool;
</script>
Understanding Partial hydration
In the above example, what will happen is that in your HTML, you'll see that Elder.js has mounted a new root component and set the initial props to {somethingCool: true}.
This means that once the user visits the page generated by Elder.js, Svelte will make that specific component interactive.
There are two differences between partial hydration and the way most frameworks handle hydration:
- With partial hydration, you're only sending the data needed to make the respective components interactive instead of data for the whole page.
- With partial hydration, you end up with multiple root components instead of one main component root. (Don't worry, you can still use Svelte stores to allow them to easily share state across them.)
The end result is generally smaller bundle/page sizes and less work for the main thread because we're only hydrating what is needed by the client instead of all of the data to build the page.
Note: All props needed by the Svelte component must be included in hydrate-client={{}} and should be JSON.stringify() friendly. This means no functions, cyclical references, etc.
// Doesn't work
<Component {ssrProp} hydrate-client={{ clientProp }} />

// Works
<Component hydrate-client={{ ssrProp, clientProp }} />
The environment variable 'process.env.componentType' will return browser or server depending on where the component is being rendered. process.env.componentType === 'server' is the correct way to check if a component is rendering on the server.
Hydration Options:
To give you fine grained control over how a Svelte component behaves when it is mounted, the following hydrate-options can be defined:
hydrate-options={{ loading: 'lazy'}}This is the default config, which uses intersection observer + requestIdleCallback with 1000ms timeout to 'lazily' mount the Svelte component.hydrate-options={{ loading: 'eager' }}This would cause the component to be hydrated in a blocking manner as soon as the js is rendered.hydrate-options={{ loading: 'none' }}This allows you to add the HTML from a Svelte component, but not to hydrate it on the client. (only really useful withhelpers.inlineSvelteComponentand possibly advanced shortcode usages.)hydrate-options={{ preload: true }}This adds a preload to the head stack as outlined above... could be preloaded without forcing blocking.hydrate-options={{ preload: true, loading: 'eager' }}This would preload and be blocking.hydrate-options={{ noPrefetch: true }}turns off prefetching.
How partial hydration works under the covers.
On the homepage of elderguide.com, we use the following code to hydrate the autocomplete component:
// within elderguide.com’s Home.svelte
<HomeAutoComplete hydrate-client={{ nh_count: data.nh_count }} />
You can do the same for a component without any props by using:
<NoPropsHere hydrate-client={{}} />At a high level, what is happening is that when the Svelte template components are compiled on the server, we've included a preprocessor that causes the Svelte compiler to instead render a div with a few specific elements and the prop passed into hydrate-client is simply JSON.stringified.
Later when we go to render these templates, we look for the removed components, generate the server rendered version and include the client component in the generated JS with the props that were given in hydrate-client.
Security Note: Whatever you pass to
hydrate-clientwill get written to the HTML shipped to the browser viaJSON.stringify. There are XSS and security considerations of passing data to the client, only hydrate content you trust.
If you are curious, the files to look at are: partialHydration.ts and svelteComponent.ts.
The important thing to note is that still use Svelte variables in hydrate-client as long as they can be processed by JSON.stringify.
Prop Hydration
Elder.js by default writes props to the HTML if they are under 2kb. If they are greater than 2kb then it is written to an external file. We call this hybrid prop hydration.
You can have finer grained control by setting props.hydration key your elder.config.js to: hybrid, html, and file.
hybridwrites prop payloads over 2kb to an external file.htmlwrites all prop payloads to the html.filewrite all prop payloads to an external file.
Prop Compression
When hydrating data heavy components such as tables, maps, graphs often you are required to write a huge amount of data to the HTML or prop file. This is made worse when there are multiple data heavy components on the same page.
Historically you'd need to write custom code to compress/decompress your data on both the server and the client.
With Elder.js' prop compression, Elder.js will generate custom packing and unpacking code for each page.
To see the power of this, let's imaging we were hydrating the entire Elder.js' "Hook Interface" to add some interactivity to our pages. Below are the first 3 records uncompressed and compressed.
  const uncompressed = [
    { props: ['hookInterface', 'errors'], hook: 'customizeHooks' },
    { props: ['helpers', 'data', 'settings', 'routes', 'hooks', 'query', 'errors'], hook: 'bootstrap' },
    { props: ['helpers', 'data', 'settings', 'allRequests', 'routes', 'query', 'errors'], hook: 'allRequests' },
    ...
  ];

  const compressed = [
    { $: ['o', 'c'], a: 'customizeHooks' },
    { $: ['e', 'b', 'd', 'h', 'hooks', 'f', 'c'], a: 'bootstrap' },
    { $: ['e', 'b', 'd', 'i', 'h', 'f', 'c'], a: 'i' },
    ...
  ];
While 3 records doesn't make a huge difference the uncompressed hookInterface is 2,664 bytes while the compressed (including the decompression code) is 1,951 bytes.
How it Works
As Elder.js is hydrating the props, it loops through the props looking for repeated primitives (string, number, booleans, etc). Where it finds repeated primitives it adds a placeholder.
Then it builds a custom decompression 'dictionary' so that when the client loads the props, it can loop through the compressed object and restore the original values.
NOTE: The largest gains from prop compression come from compression props with the same 'dictionary' across all of the components on a page.
Demo
To demo this on production website visit FindEnergy's Texas Electric Page and check out the unpack code and props. With the compression code turned on we've seen prop size drop by ~40% before brotli compression and ~10% after brotli compression.
Options:
To enable prop compression set props.compression: true within your elder.config.js.
You can also set your own compression characters by setting props.replacementChars = 'abcdefg'.
You can also see the savings in string length by enabling debug.props in your elder.config.js.
Slots
A common pitfall is to try and use slots while hydrating a component. This won't work because Svelte's mount code doesn't support slots during mounting.
To get around this, create a parent component without slots to hydrate, then import the component that uses slots within that file.
Remember, partial hydration is just a wrapper around Svelte's mount code.
Shortcodes
Whether your content lives in markdown files, on Prismic, Contentful, WordPress, Strapi, your own CMS, at some point you or someone who is managing the content will want to add some 'functionality' to this otherwise static content.
These functionalities come in a few flavors:
- Embedding an arbitrary Svelte component directly within the content.
- Adding custom HTML to style/wrap content or achieve design goals.
- Updating this otherwise static content automatically when a dynamic
datapointchanges. - Creating a placeholder so that data can be fetched from an external service such as twitter/instagram and still be available via SSR. (Example: Server rendering your latest tweets.)
Adding this type of functionality is a nightmare and is a huge source of content debt and tech debt for SEO sites.
To make these situations more approachable, Elder.js offers shortcodes.
Overview
If you aren't familiar with shortcodes, they are just strings that can wrap content or have their own attributes:
- Self Closing:
{{shortcode attribute="" /}} - Wrapping:
{{shortcode attribute=""}}wraps{{/shortcode}}
NOTE: The {{ and }} brackets vary from system to system and can be configured in your elder.config.js. However the / prefix for the closing bracket is not configurable. You may therefore need to translate shortcodes written in another format into this format expected by Elder.js, with a simple string replace strategy.
In Elder.js, shortcodes are added by defining them in a project's ./src/shortcode.js or via plugins.
Use Cases For Shortcodes:
Adding a Component Directly in Static Content
Imagine you want to empower the content team to embed a Svelte widget component anywhere within their content.
Out of the box, Elder.js adds a shortcode for this.
Simply tell them to add {{svelteComponent name='ComponentName' props='{"comment": "new comment"}' options='{}'/}} to their markup and Elder.js will hydrate and mount that component.
Adding custom HTML to style/wrap content or achieve design goals.
Imagine you're at work and the design team asks you to wrap small pieces of content with a wrapper of <div class="bg-gray mb-1 p-2"> to 100 pieces of content... but having seen this situation before, you realize that within 3 weeks it will probably need to be: <div class="bg-gray mb-2 p-3 somethingelse">.
So to future proof this code change, you introduce a box shortcode and you wrap your content in it like so:
{{box type="gray"}}
  Your content here
{{/box}}
Then in your shortcodes.js you add the following:
module.exports = [
  // ./src/shortcodes.js
  {
    shortcode: "box",
    run: async ({ props, content }) => {
      if (props.type === "gray") {
        return `<div class="bg-gray mb-1 p-2">${content}</div>`;
      }
      // note that this shortcode returns a string.
      return content;
    },
  },
];
Updating Datapoints in Static Content
The most common type of content debt is data sensitive content debt.
This is where your otherwise static content needs to have some arbitrary data point updated within it.
This is a common use case for us here at ElderGuide.com.
On our content, we often need to write things like: The US has {{numberOfNursingHomes /}} nursing homes nationwide.
Using shortcodes to make sure {{numberOfNursingHomes /}}is always up-to-date future proofs us from having this content debt.
Since our data comes from a database and all implementations will differ a bit, we'll steal the example from the Elder.js Template instead.
Imagine you need to always show the latest {{numberOfPages /}} on your site but you don't want to update {{numberOfPages /}} each time you publish a new blog post.
Here is how you'd create a shortcode using Elder.js internals to do just that:
module.exports = [
  // ./src/shortcodes.js
    {
    shortcode: 'numberOfPages',
    run: async ({ allRequests }) => {
      // allRequests represents 'request' objects for all of the pages of our site, if we know the length of that we know the length of our site.
      return allRequests.length,
    },
  },
]
Now, you can update your site to use {{numberOfPages /}} and any time the page count changes, so will the placeholder.
Advanced: A Placeholder For External Data/Content
One of the most powerful usecases for shortcodes is to use them as a placeholder for external data fetching.
Imagine you want the ability to display your latest tweet in a specific spot across multiple pages.
You setup the {{latestTweet /}} shortcode and instead of just returning the latest tweet, we also want to add some css and js to the page as well.
Here is the full power of how you'd implement this:
// import 'node-fetch@^2.6.5', 'axios'
// ./src/shortcodes.js
module.exports = [
  {
    shortcode: "latestTweet",
    run: async () => {
      // const latestTweet = await fetch(fromTwitterApi);
      // fetching the data is up to you...

      // while shortcodes often return strings, they can also return objects like so:
      return {
        // this is what the shortcode is replaced with. You CAN return an empty string.
        html: `<div class="latest-tweet">${latestTweet}</div>`,

        // You can add css here and it will get written to the head.
        css: ".box{border:1px solid red; padding: 1rem; margin: 1rem 0;} .box.yellow {background: lightyellow;}",

        // Javascript that is added to the footer via the customJsStack.
        js: "<script>var test = true;</script>",

        // Arbitrary HTML that is added to the head via the headStack
        head: '<meta test="true"/>',
      };
    },
  },
];
Shortcode Spec:
Shortcodes are defined by users by adding them to the array in their ./src/shortcodes.js.
In the spec below, there is a simple example that returns a string and a full example that returns an object.
// ./src/shortcodes.js

module.exports = [
  {
    shortcode: "simple", // the shortcode name: results in {{simple /}}
    run: async ({
      props, // the attributes of the shortcode
      content, // the content wrapped by the shortcode.
    }) => {
      return '<div class="simple">simple</div>';
    },
  },
  {
    shortcode: "returnsObject", // this is the shortcode name.
    run: async ({
      props, // the attributes defined on the shortcode.
      content, // the content wrapped by the shortcode.
      request, // the 'request' object for the page requested.
      query, // the 'query' object
      helpers, // the 'helpers' object with any user helpers and Elder.js helpers
      settings, // settings
      allRequests, // all of the 'request' objects Elder.js has.
    }) => {
      // while shortcodes often return strings, they can also return objects like so:
      return {
        html: "", // this is what the shortcode is replaced with. You CAN return an empty string.
        css: "", // You can add css here and it will get written to the head.
        js: "", // Javascript that is added to the footer via the customJsStack.
        head: "", // Arbitrary HTML that is added to the head via the headStack
      };
    },
  },
];
Using Shortcodes from Within Svelte
Sometimes you'll want to use a shortcode from within your Svelte route files or layouts.
To do this, there is a helper function to inline shortcodes in a "Svelte Friendly" way:
<!-- Layout.svelte or RouteName.svelte -->
<script>
export let helpers;
</script>
{@html helpers.shortcode({ name: 'shortcodeName', props: { background: "blue" }, content: "Inner content" })}
This results in {{shortcodeName background="blue"}}Inner content{{/shortcodeName}} being output in the HTML and picked up by the shortcode parser during the page generation process.
Escaping a Shortcode
In some cases, you may not want a specific shortcode to be processed. For example, if you are writing a blog post with code samples that include your shortcode open and close pattern, you will not want Elder.js to modify that text. As a workaround, Elder.js supports escaping a shortcode. By placing a backslash immediately in front of the shortcode open pattern, that shortcode will be left alone, and the text will display on your page as-is.
Example: \{{this is not a shortcode}} will render as {{this is not a shortcode}}, instead of throwing an error and being replaced by {{!this!}} if the leading backslash was omitted.
CSS
Elder.js has 4 different modes of handling CSS each of which can be set in your elder.config.js by settings the desired value on the css key.
file: (default) All of the CSS from Svelte components and imported into Svelte components is written to a file and included in the head.lazy: All of the CSS from Svelte components and imported into Svelte components is written to a file and included in the head but is lazily loaded. (Designed for use with the Elder.js critical path plugin.)inlineOne where all CSS a component depends on will be added to the head. This is how Elder.js started so this is the default. This is a great option for serverless rendering.noneno css handling.
Source maps are included where available when process.env.NODE_ENV !== "PRODUCTION".
Including External CSS
The best practice for including external CSS is to simply import it:
// any svelte file.
import "./path/to/css/file.css";
If the CSS isn't appearing for some reason, try rerunning Rollup.
Elder.js In Detail
Data Flow
Here is a detailed overview of how data flows through an Elder.js application from 'bootstrap' all the way to a generated HTML page.
1. Everything starts in a site's route.js files
Below is the example route.js file we'll be following the flow of.
// `/routes/blog/route.js` <-- NOTE: 'blog' is the route name.
module.exports = {
  all: async ({ query, settings data, helpers }) => {
    // await query.db(`your implementation here`) or await query.api(`get data`);
    // something that returns an array of the minimum required data for the route.
    return [{slug: 'why-kitten-rock'}];
  },
  permalink: `/blog/:slug/`,
  data: async ({request, query, settings, helpers, data }) =>{
    // we'll look at this function below.
  }

  // template: 'Blog.svelte' is assumed if not defined. (note: capitalized first letter.)
  // layout: 'Layout.svelte' is assumed if not defined.
}
2. Elder.js Bootstrap Itself
During this process, Elder.js validates all of the routes, plugins, hooks. It then runs the 'bootstrap' hook.
Finally, the all function for each route is executed.
Together, the aggregate result of each route's all function is referred to as allRequests.
3. The allRequests Hook is Run
This allows users to modify the allRequests array. If you modify or add to this array of objects, make sure each result has a 'request.route' key.
4. Full 'request' Objects are Built
Once Elder.js has a full list of requests, it then builds permalinks and full 'request' objects that will be consumed by hooks, data functions, Svelte templates, and Svelte layouts.
The full request object will look something like so (truncated for clarity):
request = {
  slug: `why-kittens-rock`,
  // ... any other keys from the `request` object returned from the `all` function.

  // below is then added by Elder.js
  permalink: "/blog/why-kittens-rock",
  route: "blog",
  type: "build", // server or build.
};
It is important to note that all of the params of the 'request' objects returned by the all function will be present in the 'request' object even though our example only uses slug.
5. Hooks are Executed Until the Route's data function
The data flows through all of the hooks (as shown above) until it reaches a route's data function which is run just before the data hook.
How you modify the data in your data function is up to you. Anything you can do in Node.js, you can do here.
module.exports = async ({ query, settings, request, data }) => {
  // do magic to get data from your data store.
  // const yourData = await query.db(`SELECT * FROM city WHERE slug = $1`, [request.slug])
  // or
  // const yourData = await query.api.get(`https://yourdata.com/api/city/${request.slug}`)...
  const yourData = {
    sweet: "Golden Metal",
  };
  return yourData;
};
6. The 'data' hook is Executed
The data hook is generally used by plugins to modify data for a route.
If for some reason you have an empty data object, check that your plugins and hooks aren't returning just their data, instead of using a pattern like so:
return {
  data: {
    ...data, // this is from the parameter of the hook function.
    ...additionalData, // this data from the hook or plugin.
  },
};
You can debug this by setting debug.hooks: true in your elder.config.js.
7. The data Object is passed to the Svelte template
In this example, ./src/routes/blog/Blog.svelte may look like this:
<script>
  export let data; // here is the 'data' object we've been following.
  export let settings; // Elder.js settings
  export let helpers; // Elder.js helpers and user helpers.
  export let request; // 'request' object from above. ....
</script>
8. The HTML returned by Blog.svelte is passed into Layout.svelte
Svelte layouts receive the same props as the template file but also include a templateHtml prop which would be the html from Blog.svelte in this example.
9. Page Generation Completes
All further hooks are run until the 'request' has been completed.
This includes user hooks, system hooks, and plugin hooks.
Specifications and Config
Below are details on common specifications and config requirements.
Config: elder.config.js
By default, Elder.js looks for an elder.config.js file in your project root and will import any settings there and merge them with the default.
Below is what the default configuration file looks like. This is automatically generated if an elder.config.js file is missing.
module.exports = {
  origin: "", // The URL of your site's root without a trailing slash. https://yourdomain.com.
  lang: "en", // Your site language will be set in html.
  rootDir: "process.cwd()", // Here your package.json lives.
  distDir: "public", // Where should files be written? This represents the "root" of your site and where your html will be built.
  srcDir: "src", // Where Elder.js should find it's expected file structure. If you are using a build step such as typescript on your project you may need to edit this.
  props: {
    hydration: "hybrid", // How should props be handled. "hybrid": writes props under 2kb to the html props > 2kb are an external file. "html": props are written to page html. "file" writes props to a hashed external file.
    compress: false, // Compress the props of hydrated components.
    replacementChars: "$abcdefghijklmnopqrstuvwxyzABCDEFGHIJKLMNOPQRSTUVWXYZ", // List of characters to be used when compressing props
  }
  debug: {
    reload: false, // Adds debugging information for hot reloading
    props: false, // Adds debugging information for prop compression
    stacks: false, // Outputs details of stack processing in the console.
    hooks: false, // Output details of hook execution in the console.
    shortcodes: false, // Output details of shortcode execution in the console.
    performance: false, // Outputs a detailed speed report on each pageload.
    build: false, // Displays detailed build information for each worker.
  }
  hooks: {
    disable: [], // This is an array of hooks to be excluded from execution. To be clear this isn't the "hook" name found in the "hookInterface.ts" file but instead the name of the system user plugin or route hook that is defined.  For instance if you wanted to by name to prevent the system hook that writes html to the public folder during builds from being run you would add "internalWriteFile" to this array.
  }
  server: {
    prefix: "", // If Elder.js should serve all pages with a prefix. (deprecated)
    cacheRequests: true, // If Elder.js should cache requests when using dynamic routing. It may be useful to turn off the cache when combining Elder.js with another caching solution to reduce the resources consumed by the server.
    dataRoutes: false, // Experimental: Allows for getting a json response of the data object of a url. Defaults to [path]/data.json but can be any suffix/filename after the route.
    allRequestsRoute: false, // Experimental: Allows for getting a json response of the all requests object by hitting a url. Defaults to /allRequests.json if "true" but can be overridden with any string.
  }
  prefix: "", // The prefix Elder.js should prepend to all pages and assets built/served.
  build: {
    numberOfWorkers: -1, // This controls the number of worker processes spun up during build. It accepts negative numbers to represent the number of cpus minus the given number. Or the total number of processes to spin up.
    shuffleRequests: false, // If you have some pages that take longer to generate than others you may want to shuffle your requests so they are spread out more evenly across processes when building.
  }
  shortcodes: {
    openPattern: "{{", // Opening pattern for identifying shortcodes in html output.
    closePattern: "}}", // closing pattern for identifying shortcodes in html output.
  }
  plugins: {}, // Used to define Elder.js plugins.
  replacements: {}, // Values to be replaced during esbuild bundling. {key: "value"} format.
  css: "file", // How should css found in svelte files be handled? 'inline' emits styles into the head. 'file' adds a file include into the head. 'none' doesn't do anything with the styles.
}
Elder.js Expected file structure
Elder.js expects a specific file structure outlined below. This is why we recommend you start with the Elder.js template.
You can configure or rename your src/build folders in your elder.config.js.
Project Root
| elder.config.js
| package.json
| rollup.config.js
| ... (other common stuff, .gitignore, svelte.config.js... etc)
| -- src
| -- | -- build.js
| -- | -- server.js
| -- | -- hooks.js
| -- | -- shortcodes.js
| -- helpers
| -- | -- index.js
| -- | -- ...
| -- layouts
| -- | -- Layout.svelte
| -- routes
| -- | -- [route] ('blog' in this example)
| -- | -- | -- Blog.svelte
| -- | -- | -- route.js
| -- plugins
| -- | -- [plugin] ('elderjs-plugin-markdown' for example)
| -- | -- | -- index.js
| -- components
| -- | -- [component] ('Contact' in this example)
| -- | -- | -- Contact.svelte

(optional/recommended)
| -- assets
| -- | -- files to be copied to your public folder.
Hook Specification
Hooks are the core of how to make site level customizations. Below is the default spec for a hook.
module.exports = {
  hook: "", // The hook the defined "run" function should be executed on.
  name: "", // A user friendly name of the function to be run.
  description: "", // A description of what the function does.
  priority: 50, // The priority level a hook should run at. The highest priority is 100 and 1 is the lowest priority.
  run: ()=> {}, // The function to be run on the hook.
  $meta: {
    type: "", // What type of hook this is. Defined by Elder.js for debugging.
    addedBy: "", // Where the hook was added from. Defined by Elder.js for debugging.
  }
}
Plugin Specification
Plugins are a bundle of hooks with their own closure scope based on the object that is returned by the init() function. This means that all hooks and shortcodes receive the plugin definition returned by the init() function and are able to store properties in that scope throughout the hook lifecycle. Below is the default specification for a plugin.
module.exports = {
  name: "", // The name of the plugin.
  description: "", // A description of the plugin.
  init: ()=> {}, // A sync function that handles the plugin init. Receives plugin definition. plugin.settings contains Elder.js config. plugin.config contains plugin config
  routes: {}, // (optional) Any routes the plugin is adding.
  hooks: [], // An array of hooks.
  config: {}, // (optional) An object of default configs. These will be used when none are set in their elder.config.js.
  shortcodes: [], // Array of shortcodes
}
Route Specification
Routes can be defined by plugins or by including a ./src/[routeName]/route.js file.
module.exports = {
  template: "", // Svelte file for your route. Defaults to [RouteName].svelte if not defined. Relative to /src
  layout: "", // Svelte file for your layout. Defaults to Layout.svelte if not defined. Relative to /src
  all: ()=> {}, // A sync/async function that returns an array of all of the 'request objects' for this route.
  permalink: ()=> {}, // Sync function that turns request objects from the all() function into permalinks which are relative to the site root
  data: ()=> {}, // Async/sync function that returns a JS object. Can also be a plain JS object.
  name: "", // A name used to identify the route internally. If not defined it uses [routeName] from "/routes/[routeName]/route.js". Mainly used with helpers.permalink.[name]().
  dynamic: false, // Enables dynamic route parameters in SSR mode. This means /:foo/ will be derived from the visited URL. Useful for logged in experiences.
}
Shortcode Specification
Shortcodes are a great way to future proof your content. Below is the default shortcode specification. These should be defined in the array exported by your ./src/shortcodes.js
module.exports = [{
  shortcode: "", // The 'name' of the shortcode. {{name /}}
  run: ()=> {}, // A sync/async function that returns the html css js and head to be added to the html.
}]
Requirements for name and description fields
In various places such as on hooks, plugins, and stacks, you'll see that Elder.js requires name and description fields.
While this requirement may seem like an added development burden initially, it makes it extremely easy for you to publicly share your hooks or bundle them into plugins in a way others can use. (Plus your future self will thank you when you need to modify your code a year from now.)
These fields are also used to generate the pretty printouts of how long each hook is adding to your page generation time that you see when you enable debug.performance = true in your elder.config.js.
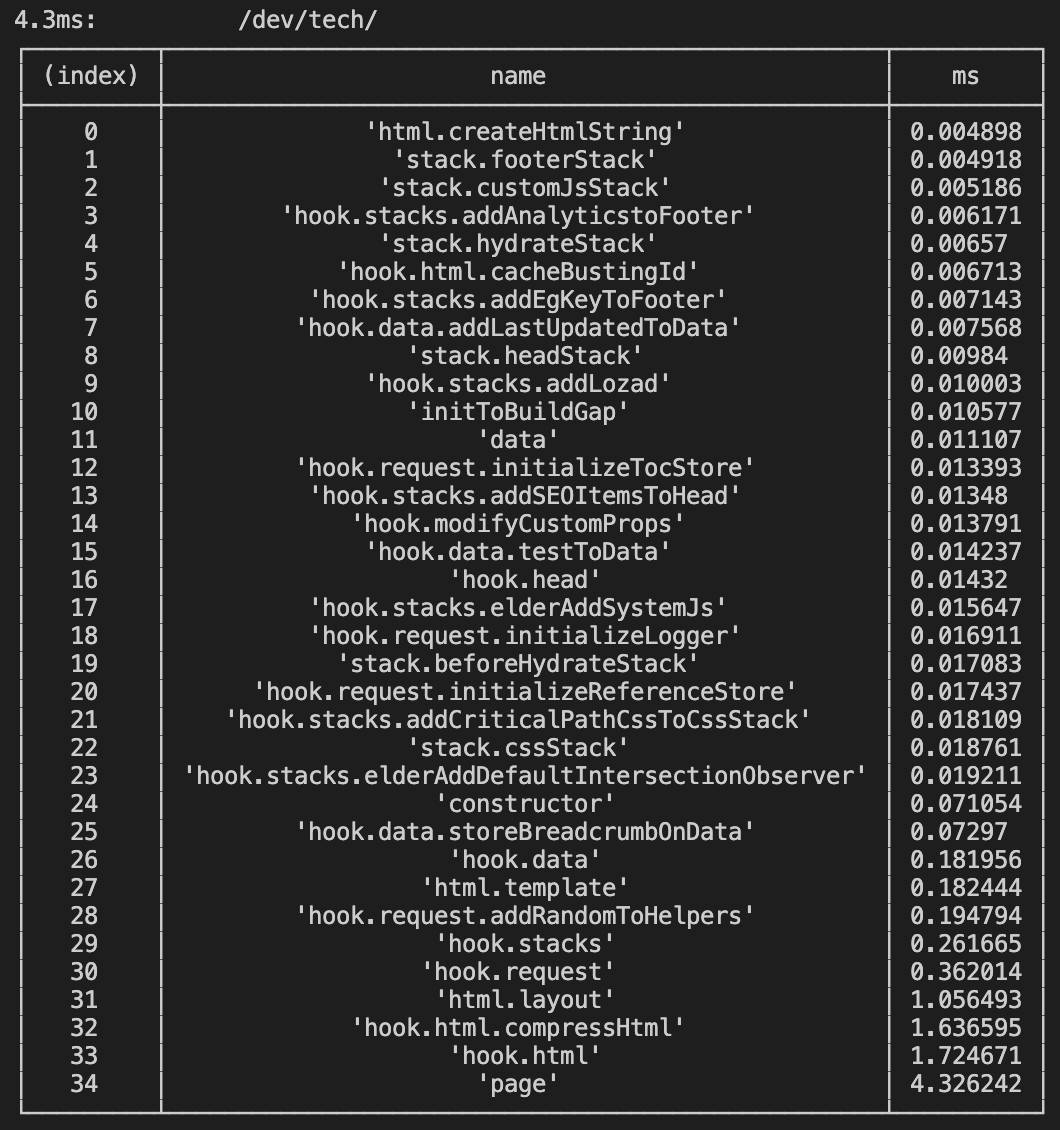
As a team, we've found build times to be especially important when building 10k+ page sites as 100ms adds 16+ minutes to your build time. What gets measured gets managed... and we know faster deploys leads to deploying more often.
Stacks: Predictable String Concatenation
In a few places, you may see that Elder.js is using 'stacks.' These are just our internal way of processing strings that need to be concatenated.
Here are the type defs:
export type StackItem = {
  source: string;
  string: string;
  priority: number;
  name: string;
};

export type Stack = Array<StackItem>;
In short, a stack is an array of objects that are concatenated together in order. Think of it like a queue. An item with a priority of 1 is the lowest priority. An item with a priority of 100 is the highest.
Hooks can add items to the stack, when the stack is processed, it is sorted in order of priority and then all strings are concatenated.
Automatic Behavior
Elder.js does quite a bit of automatic behavior much of which is based on using the standard filesystem.
Instead of burying this magic, things that happen automagically are logged to the console unless you set debug.automagic = false in your elder.config.js file. That said, here are some of the things that happen automatically:
- All exports from
./src/helpers/index.jsare imported and added to thehelpersobject which is available in thedatafunctions and all hooks. - All hooks in your
./src/hooks.jsfile,./routes/[routeName]/route.jsfiles, and plugins are imported and validated. - All optional variables in your routes file will be set automatically if Elder.js detects that the files needed are present.
Default Helpers
By default, Elder.js adds a few items to the helpers object that is available in hooks, Svelte templates/layouts, and data functions.
permalink: A permalink resolver:helpers.permalink[routeName]({requestObject}). Simply pass in a request object and it'll resolve the permalink. It is often used like sohelpers.permalink.blog({slug: 'kittens-rock'}).shortcode: A more comfortable way to use shortcodes within Svelte files. Common usage within a .svelte file may look like :{ @html helpers.shortcode({name: 'box', props: {class: "yellow"}, content: "content string here" }) }. If you are using the default Elder.js shortcode brackets, this would output{{box class='yellow'}}content string here{{/box}}which would be parsed like any other shortcode.inlineSvelteComponent: This helper is mainly useful when needing to add a Svelte component to your html via, hooks, plugins, or custom shortcodes. All of the options available when hydrating a component are available with this helper, it simply outputs the required hydration html so that Elder.js picks it up and hydrates the client.helpers.inlineSvelteComponent({name: 'Foo', props: { anything: true }, options: { preload: true, eager: true }})
Elder.js Exports:
server
Elder.js was built as a static site generator, but it offers a built-in server that is pretty snappy past the initial bootstrap phase.
This can be used to power server rendered (SSR) apps or used to preview the output of your static site without having to build.
You can see how this functionality is utilized in the elderjs-template.
build
The build function exported from Elder.js uses Node's cluster module to use multiple processes to build your site.
In short, here is how build works at a high level:
The main process runs through bootstrap and collects allRequests. It then spins up workers and divides the requests evenly across these workers. It then waits for the workers to complete, runs any hooks for after build and completes.
There are two notable config options: numberOfWorkers and shuffleRequests which you can read about in the config section.
getRollupConfig
A function that generates all of the Elder.js required rollup output.
See the clonable template for the minimum viable rollup config.
Replacements
If you need to add values to be replaced during bundling, you can do so like this:
const { getRollupConfig } = require("@elderjs/elderjs");
const svelteConfig = require("./svelte.config");
module.exports = [
  ...getRollupConfig({
    svelteConfig,
    // object keys are replaced by values.
    replacements: { "http://localhost:4020": "https://production.com" },
    rollupConfig: {},
  }),
];
getElderConfig
A helper function that returns the user's elder.config.js with defaults added in where they aren't defined.
Using typescript/postcss/scss or other Preprocessors
Elder.js uses the svelte-preprocess package to enable the use of typescript, scss, postcss or any other preprocessor that the svelte-preprocess package supports. To enable a preprocessor, you need to first install the dependecies for it, for example, to enable typescript and sass, you need to install the following dependecies
npm install -D typescript node-sassFor more info about what dependecies you need to install to enable the preprocessor of your choice, you can look at the installation guide of svelte-preprocess
Then you can start using them in your svelte file by using lang="ts" or lang="scss" in your script and style block respectively. To change the settings of your preprocessor, open the svelte.config.js file and configure it using the object passed to sveltePreprocess like this
const sveltePreprocess = require("svelte-preprocess");

module.exports = {
  preprocess: [
    sveltePreprocess({
      postcss: {
        plugins: [require("autoprefixer")],
      },
    }),
  ],
};
Go through the svelte-preprocess docs to learn about all the supported features.
Extra setup for typescript
You should be able to use typescript in svelte files by following the instructions above but for customizing your typescript config, we recommend you rename the sample.tsconfig.json in the default template to tsconfig.json and use that as your typescript config. You can also extend svelte/tsconfig which is the recommended config by the Svelte team. To run typescript checks as part of your linting process or CI/CD step, install the svelte-check package and add a script to your package.json to run this tool.
"type-check": "svelte-check"Typescript support for non-svelte files is coming soon, track the progress here
Esbuild
EXPERIMENTAL! This could change!
With Elder.js v1.5 we introduced an experimental development bundler running on esbuild.
Using this we've seen development reloads drop from 11s to ~1s.
To use it esbuild, clone the latest template and run npm run esbuild where you'd usually run npm run dev.
There are still some minor bugs we are working through, but it has been a dramatic improvement for our development team.
As esbuild becomes stable our plan is to move away from rollup for bundling and use esbuild or vite exclusively.
FAQ
How can I disable a hook?
You can disable core Elder.js hooks, just like any other hook. Simply add the hook name to the hooks.disable array in your elder.config.js.
A full list of all of the hooks can be found in the hooks.ts.
For instance, if you wanted to disable the intersection observer, simply make sure your hooks.disable array includes elderAddDefaultIntersectionObserver as shown below:
// elder.config.js, truncated

hooks: {
  disable: ['elderAddDefaultIntersectionObserver'],
},
Caching Client Assets
By default Elder.js emits hashed files for assets under its control into the ./${distDir}/_elderjs/ folder.
This allows for aggressive caching of client side assets such as cache-control public, max-age=31536000, immutable.
Integrate PurgeCss with Elder.js
If you want to purge unused CSS to reduce your bundle size, you can do it with the help of @fullhuman/postcss-purgecss. You will also need to use postcss-import to use the @import 'my/css/file.css statements within the <style> block of your svelte components.
NOTE: You need to import your CSS within your <style> block so that @fullhuman/postcss-purgecss can purge your unused CSS. Importing the CSS within your <script> block will not purge any CSS at all.
Example:
Component importing your styles
// src/layouts/Layout.svelte
<script>
  // Importing CSS here will not purge unused classes.
  import "../../assets/css/to/purge" // won't be purged
  import "bulma/css/bulma.css" // won't be purged`
</script>

<style>
  /* Importing here will effectively purge unused CSS */
  @import "../../assets/css/to/purge";
  @import "bulma/css/bulma.css";
<style>

<section class="hero">...</section>
Svelte configuration
// svelte.config.js

const sveltePreprocess = require("svelte-preprocess");

// It is recommended to purge only in production environments
const isProd = process.env.NODE_ENV === "production";

module.exports = {
  preprocess: [
    sveltePreprocess({
      postcss: {
        plugins: [
          require("postcss-import")(),
          require("autoprefixer"),
          isProd &&
            require("@fullhuman/postcss-purgecss")({
              content: ["./src/**/*.svelte"],
              safelist: { greedy: [/svelte-/] },
              extractors: [
                {
                  extractor: (content) => [
                    ...(content.match(/[^<>"'`\s]*[^<>"'`\s:]/g) || []),
                    ...(content.match(/(?<=class:)[^=>\/\s]*/g) || []),
                  ],
                  extensions: ["svelte"],
                },
              ],
            }),
        ],
      },
    }),
  ],
};
How can I copy files to public?
The template project has a hook that copies your ./assets/ folder to the distDir location defined in your elder.config.js.
Why can't I use Svelte templates for data fetching/manipulation?
If you’re familiar with Sapper, you may be accustomed to storing your data fetching and manipulation logic in your Svelte files.
Initially, when designing Elder.js, we experimented with this approach but found that a separate data function, which returned a single data object ready to be consumed by your svelte template was a cleaner separation of concerns.
data functions for fetching, manipulating, and returning data. Svelte for handling data presentation, interactivity, and reactivity.
Note: If you really want to do data fetching and manipulation in your templates, nothing is stopping you.
Elder.js Compared to SvelteKit
How Elder compares to SvelteKit is a very common question. The key distinction is that Elder.js is designed with SEO in mind and offers tools to help make building large static sites easier.
- Partial Hydration: Most "modern javascript frameworks" use client side routing which requires complete rehydration of the client. This can cause major SEO issues as Google Bot's process for indexing javascript heavy websites differs from that of mainly static sites. This is why many javascript sites that use
react,vue,angularandsveltestruggle with SEO even if they are server side rendered (SSR). In our experience partial hydration results in less indexation issues for Google much likejquerysites of yester-year. This is why Elder.js has gone all-in on partial hydration. We believe it is a competitive SEO advantage. (Google has a great guide on hydration.) - Data Flow: When it comes to building non-trivial static sites, there is a lot of data massaging that needs to be in sync across the entire project. A good example is when reading from a headless CMS or generating a sitemap. With Elder.js, you can organize this data once and add it where you need to via a hook and it will be available on all pages. This is what enables Elder's extreme build speed, whereas SvelteKit has no data pipeline opinion.
- Elder.js has
shortcodeswhich allow you to future proof your content. - Elder.js uses
hooksallowing your team to encapsulate much of a site's complexity in one place. These hooks also empower a growing ecosystem of plugins. - Complete control over routing and url structure. SvelteKit uses file based routing which has it's benefits and limitations.
In short, Elder.js is purpose built to run flagship SEO sites with 10-100k pages.
SvelteKit is not out of beta but currently does not support Partial Hydration - you have to opt in/out of JS on a per-page basis, instead of per-component.
SvelteKit uses Vite and HMR which result in a bit better developer experience.
Adding Database Access
If your project is going to be querying its data from a database, we recommend using the bootstrap hook and adding a connection to your database on the “query” property. See this hook example above.
Customizing the HTML 'shell'
In certain cases, you may want to customize the shell that Elder.js writes the templateHtml and layoutHtml to.
Often a quick regex on the html hook is enough, but if you'd like complete control, you can overwrite how Elder.js compiles the html by:
- Add
elderCompileHtmlto thehooks.disablearray in yourelder.config.js. - Register a new function on the
compileHtmlhook and implement your desired functionality. (Look forelderCompileHtmlin @elderjs/elderjs'shooks.tsfile.)
How Does Elder.js Differ From Sapper?
Sapper is a full stack Svelte framework that does server side rendering and supports static exporting of your site.
While we found Sapper to be a nice solution for small sites, when we tried to use it to build out elderguide.com, we hit some major roadblocks:
- V1 of our internal test site had about ~500 pages. Sapper was talking about 15 minutes to build our site and we had worked hard to improve that speed. Since we knew our site would have over 100k pages in the coming years, we knew we needed a different solution.
- Sapper uses a file encoded routing system. This means that /blog/[id]/ becomes /blog/:id/. While this type of routing is common in JS frameworks, there are several SEO reasons you may want content of different types to live within the same subfolder. (In our specific use case, we wanted /senior-living/[content]/, /senior-living/[facilities]/, and /senior-living/[experts]/ to all live under /senior-living/. When you're planning on building a 100k page site over 5 years, early decisions matter. Especially for SEO as each permalink change adds a bit of 'drag.')
- We found Sapper’s data flow hard to reason about for data driven and complex sites.
For data fetching, Sapper uses a preload function to fetch a page’s initial props and build the page. This is done to enable client side routing and full client side hydration as this preload function is designed to run on both the client and the server.
This is a pretty cool feature for Apps but for a static SEO focused site, it was overkill and cause huge problems with our dataflow when paired with the chosen routing system.
Elder.js solves these roadblocks.
- Build times on our ~20k page site are routinely less than 10 minutes on a modest VM. In our analysis, over 55% of our build time is spent waiting on the database server so you may see much faster builds. :)
- You can setup the routes however you need. The only requirement is that you don’t have two routes with the same url. :) (We’ll tell you if it happens)
- Every route defined has a single
datafunction where you can do your database queries, read markdown files, and do whatever magic you need to prepare your data for display.
Upgrading to v1.0.0:
Below are the breaking changes between v1 and earlier versions:
linkhelper is removed from templates. You can access it athelpers.permalinksthe same way as before solink.blog({slug: "foo"})becomeshelpers.permalinks.blog({slug: "foo"})routeHtmlorrouteHTMLin the Layout.svelte in the Elder.js template has been changed totemplateHtml. If you're getting no output from your templates, this is your issue. Rename this variable and things should work again.- The order of stacks and hook priorities have been reversed. This may cause hooks to run out of order. Please look at your hooks. Before this update, hooks with a priority of 1 were the highest priority, now they are the lowest.
process.browserreplacements in rollup.config are now 'process.env.componentType' which will returnbrowserorserver. Remember process.env variables are strings. soprocess.env.componentType === 'server'is the correct way to check if a component is rendering on the server.- There was a major rework to the
elder.config.js. If you defined anything in theelder.config.jsunder thelocationskey, you'll need to rework those into thedistDir,srcDir, androotDir. siteUrlin elder.config.js was changed tooriginand you'll get an error if you don't set it.- Remove automatic checking for a tsconfig. If you want to use typescript, please set your
srcDirto the build folder found in yourtsconfig.
File / Hook Changes:
- The
./src/assets/folder has been moved to./assets/(project root). - You'll need to update your
copyAssetsToPublichook as shown below. - You'll need to update your
rollup.config.jsto be updated as shown below.
  // hooks.js
  // replace your old copyAssetsToPublic
  {
    hook: 'bootstrap',
    name: 'copyAssetsToPublic',
    description:
      'Copies ./assets/ to the "distDir" defined in the elder.config.js. This function helps support the live reload process.',
    run: ({ settings }) => {
      // note that this function doesn't manipulate any props or return anything.
      // It is just executed on the 'bootstrap' hook which runs once when Elder.js is starting.

      // copy assets folder to public destination
      glob.sync(path.resolve(settings.rootDir, './assets/**/*')).forEach((file) => {
        const parsed = path.parse(file);
        // Only write the file/folder structure if it has an extension
        if (parsed.ext && parsed.ext.length > 0) {
          const relativeToAssetsFolder = path.relative(path.join(settings.rootDir, './assets'), file);
          const outputPath = path.resolve(settings.distDir, relativeToAssetsFolder);
          fs.ensureDirSync(path.parse(outputPath).dir);
          fs.outputFileSync(outputPath, fs.readFileSync(file));
        }
      });
    },
  },
// replace your old rollup.config.js
const { getRollupConfig } = require("@elderjs/elderjs");
const svelteConfig = require("./svelte.config");
module.exports = [...getRollupConfig({ svelteConfig })];Upgrading from v1.4.# ~> v1.5.0
Partial Hydration Changes:
v1.5.0 has a breaking change in the default way svelte components are hydrated.
In our development of several projects with Elder.js we've found that using window.addEventListener('load', ()=>{}) to bootstrap the IntersectionObserver can result in First Input Delay (FID) of greater than 200ms on pages with many hydrated components.
To remedy this situation, Elder.js will now use RequestIdleCallback to bootstrap the IntersectionObserver. If you are unfamiliar with RequestIdleCallback it allows the browser to run a callback when the event loop is idle or when a timeout is set. Whichever comes first. Elder.js's default timeout is set to 1000ms.
This means that if the main loop is blocked for 1000ms your components may not be mounted until then with the default Elder.js config.
Since Elder.js is an SEO-first framework, we believe this is a sensible default as Web Vitals are now a ranking signal.
If you have a component above the fold that must be hydrated right away, we recommend using <Component hydrate-client={{props}} hydrate-options={{loading : 'eager'}} />.
Dropping IE11 and legacy support
IE11 is on it's way out. We worked to support it, but currently we don't have a business case for it so we can't justify the maintenance burden. If your team relies on Elder.js for ie11 support and are interested in maintaining it, please let Nick Reese know.
claim_html_tag issues
If you see the error: No matching export in "node_modules/svelte/internal/index.mjs" for import "claim_html_tag" make sure the svelte package in your project is updated.